Organizations often have a preferred base image from which they create virtual machines or instances. Base images are generally made up of a specific OS build and patch level, along with any software, configuration and security settings required by the organization or a specific use case.
These base images are bundled into a “golden image” and shared as a standard across the organization. As time goes on, the requirements may change — security patches need to be applied or configuration settings have been updated. Tools exist to help manage the creation of these images, and DevOps teams have been leveraging their skills with automation to ensure a consistent and efficient build process.
Security can’t be an afterthought when creating golden images. It’s a best practice to scan images during the build process. If vulnerabilities or compliance issues are found, the image pipeline should be abandoned before the image is published. Shifting left and scanning for compliance issues and vulnerabilities in the image build process can help eliminate runtime issues when instances are instantiated.
Let’s walk through a tutorial and see how we can secure golden images built by a popular system and container build automation tool: HashiCorp Packer.
Securing Builds with HashiCorp Packer
HashiCorp Packer is a utility that allows for the creation of identical images across multiple platforms using a single-source configuration. This could be your organization’s tool of choice if you have a multicloud deployment. Packer can easily integrate with different CI/CD software to create a build pipeline for golden images. It is extensible and can be integrated with custom utilities.
Packer can execute from a central build server, either in your data center or in the cloud.
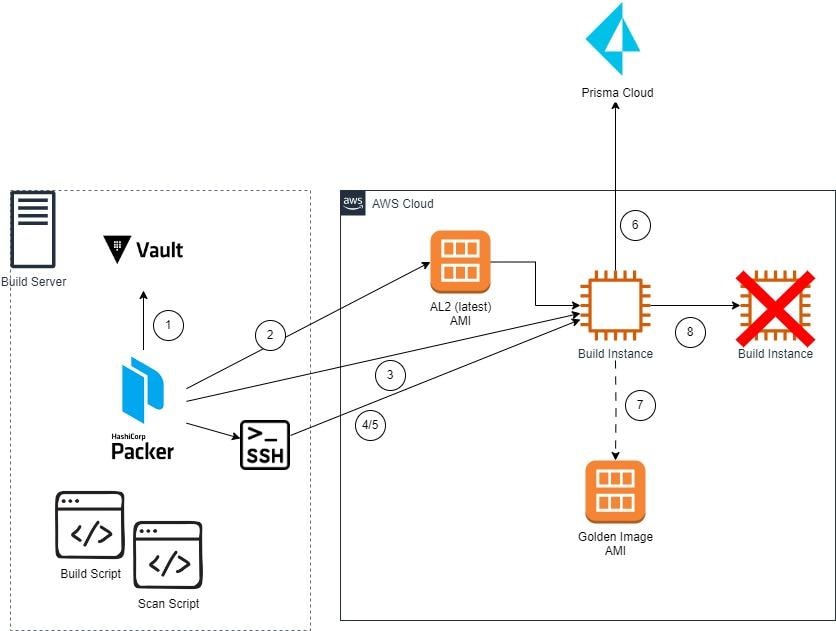
As shown in figure 1, when the build process begins, Packer first connects to HashiCorp Vault to get the Prisma Cloud credentials and other sensitive information. Then, Packer determines the latest Amazon Linux 2 AMI and creates an Amazon EC2 instance to perform the build. Once the instance has been created, Packer connects to it via SSH and executes the build scripts.
Once the build scripts complete, Packer executes the Scan script — which will connect to Prisma Cloud — downloads and installs the Defender, executes a scan and evaluates the results. Then, it compares the results to a policy to see if the compliance or vulnerability threshold was crossed. If the scan results don’t meet the predefined thresholds, the build fails and no image is created. If the scan succeeds, a golden image is created. Then the build instance is terminated.
Let’s walk through a demo of how you can use Prisma Cloud and HashiCorp Packer to secure your golden images.
Getting Started with Prisma Cloud and HashiCorp Packer
To work through the demo on your own, follow these steps to ensure you have all necessary prerequisites:
Step 1: Obtain access key credentials from Prisma Cloud. If you don’t already have a key, open the Prisma Cloud console and then navigate to Settings → Access Control → Access Keys to create one.
Step 2: Locate the Prisma Cloud Compute Console URL by navigating to the Prisma Cloud console and then to Compute → System → Utilities. Use the value for “Path to Console” as the Console URL.
Note: For the purposes of this blog, you’ll need the ability to install software either on your local workstation or a build server, depending on where you are testing.
Step 3: Make sure that you have network connectivity from your local laptop or build server to AWS, and then from AWS to Prisma Cloud. Packer will create a host in the default VPC; there should be an outbound network path to Prisma Cloud if you are using the AWS-created default VPC. If you want to use a nondefault VPC, we’ll cover how to do that later in the demo.
Step 4: Ensure the build user has the appropriate permission in AWS. You’ll need to create a user — or assume a role — that has the permissions documented here. Additionally, you’ll need to configure your AWS CLI profile with the appropriate credentials.
Tutorial: Securing Your Golden Images
To start, we’ll need to configure Prisma Cloud. First, we want to create a Collection in Prisma Cloud so that we can limit the scope of the vulnerability and compliance policy rules to only the instance that Packer manages.
Create a collection by following these steps:
- Log in to Prisma Cloud.
- Navigate to Compute → Manage → Collections and Tags.
- Click “Add collection.”
- Give the collection a name — for example, “packer-demo-collection” — and description.
- Change the “Hosts” field to specify the hosts that Packer will create. The Packer build file specifies these will be named “packer-demo-build” — specify the Hosts field as “packer-demo-*.”
- Click Save.
Now, we want to create a vulnerability rule. The vulnerability threshold for the Packer build process will be set in the Prisma Cloud console. This provides for separation of duties so that the security operations team can identify the appropriate threshold for the build to fail, and the build administrators can create and execute builds that automatically adhere to that policy.
To create a vulnerability rule that identifies the failure threshold, we’ll need to:
- Log in to Prisma Cloud.
- Navigate to Compute → Defend → Vulnerabilities → Hosts.
- Click “Add Rule.”
- Name “packer-host-vulnerability-rule”.
- Scope it to the collection created above.
- Select a severity threshold: Off, Low, Medium, High or Critical.
- Click Save.
Once we’ve created the vulnerability rule, we can create a compliance policy in the Prisma Cloud console. This enables the security operations team to identify critical configuration checks that will fail the build if they’re missing. To create a compliance policy, we need to:
- Log in to Prisma Cloud.
- Navigate to Compute → Defend → Compliance → Hosts.
- Click “Add Rule.”
- Name “packer-host-compliance-policy.”
- Scope it to the collection created above.
- Under compliance actions, select the appropriate checks and related action: “Ignore” or “Alert” will disregard the check and “Block” will fail the build.
- Click Save.
Now we can configure the build. To start, we need to download the artifacts for this blog and extract them to our build server. Then, we can install HashiCorp Packer and HashiCorp Vault according to the instructions for your build server’s platform.
Then, we can install the latest AWS CLI and ensure a profile is created with the appropriate AWS credentials: aws configure --profile packer-demo. Once we’ve created that profile, we can start the Vault server. Since this is a demonstration, run Vault in development mode with command: vault server -dev. Note the Root Token value displayed as output.